GKE Shielded Nodesによる整合性監視について
このブログシリーズ 「クラウドセキュリティ 実践集」 では、一般的なセキュリティ課題を取り上げ、「なぜ危険なのか?」 というリスクの解説から、 「どうやって直すのか?」 という具体的な修復手順(コンソール、gcloud CLI、Terraformなど)まで、分かりやすく解説します。
この記事では、GKE Shielded Nodesの整合性監視機能が無効化されている場合のリスクと対策を解説します。
ポリシーの説明
GKE(Google Kubernetes Engine)のShielded Nodesは、ノードレベルでの高度なセキュリティ機能を提供します。整合性監視(Integrity Monitoring)は、Shielded VMの3つの主要機能の1つで、ノードのブートプロセスと実行時の状態を継続的に監視します。
整合性監視の仕組み:
- vTPM(仮想Trusted Platform Module 2.0) を使用してブート測定値を保存
- Early Boot Validation でブートプロセス全体をハッシュ化
- Late Boot Validation でカーネルとinitramfsの整合性を検証
- Cloud Logging に測定結果を記録し、改ざんを検出
整合性監視は、UEFI測定ブート(Measured Boot)プロトコルに基づき、以下のコンポーネントを監視します:
- UEFIファームウェア
- セキュアブート証明書データベース
- GRUBブートローダー
- カーネルコマンドライン
- カーネルイメージ
- initramfsイメージ
修復方法
コンソールでの修復手順 Google Cloud コンソールを使用して、GKEノードプールで整合性監視を有効化します。
重要な前提条件
- GKEクラスタバージョン:1.18以降(Shielded GKE Nodes完全サポート)
- ノードイメージ:Container-Optimized OS(Ubuntu、Windows Serverも対応)
- 既存ノードプールの制限:Shielded Node設定は変更不可(新規作成が必要)
既存ノードプールでの整合性監視有効化手順
- Google Cloud コンソールで「Kubernetes Engine」→「クラスタ」に移動
- 対象のクラスタ名をクリック
- 「ノードプール」タブを選択
- 新しいノードプールを追加するため「ノードプールを追加」をクリック
- 基本設定:
- 名前: 例)
secure-node-pool-v2 - ノード数: 既存プールと同じか必要に応じて調整
- 名前: 例)
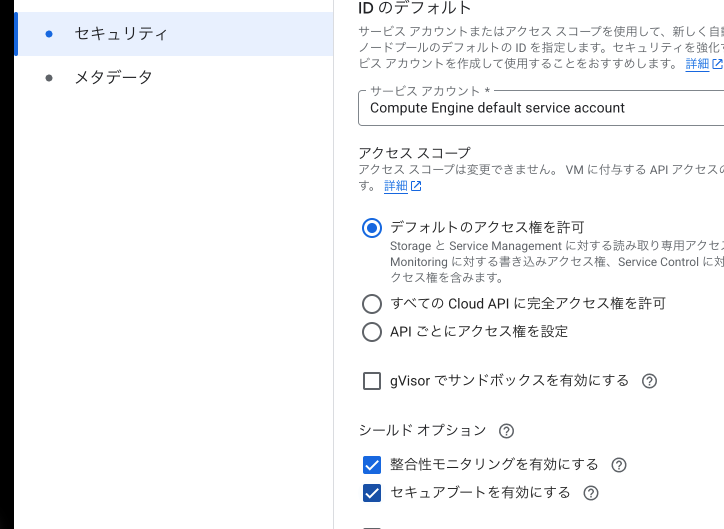
- 「ノード」セクションで「セキュリティ」を展開
- 「Shielded GKE ノード」セクションで:
- 「Shielded GKE ノードを有効にする」にチェック
- 「整合性監視を有効にする」にチェック(重要)
- 「セキュアブートを有効にする」にチェック(推奨)

- マシンタイプとその他の設定を既存プールと同様に設定
- 「作成」をクリック
ワークロードの移行手順
- 新しいノードプールが「実行中」になるまで待機
- 既存ノードプールのノードを排出(drain):
# 全ノードを一覧表示 kubectl get nodes -l cloud.google.com/gke-nodepool=<old-pool-name> # ノードを1台ずつ排出(本番環境では段階的に実施) for node in $(kubectl get nodes -l cloud.google.com/gke-nodepool=<old-pool-name> -o name); do kubectl drain $node --ignore-daemonsets --delete-emptydir-data --force --grace-period=300 sleep 60 # ワークロードの移行を待機 done - すべてのPodが新しいノードプールに移行されたことを確認
- 古いノードプールを削除:
- ノードプールタブで古いプールを選択
- 「削除」をクリック
整合性監視のアラート設定
- 「セキュリティ」→「Security Command Center」に移動
- 「設定」→「検出器」を選択
- 「Container Threat Detection」を有効化
- 整合性監視違反の通知設定:
- 「通知」タブで新しい通知ルールを作成
- フィルタ:
category="INTEGRITY_VIOLATION" - 通知チャネル: メール、Slack、PagerDutyなど
Cloud Loggingでの監視設定
- 「ロギング」→「ログエクスプローラー」に移動
- 以下のクエリで整合性監視イベントを検索:
resource.type="gce_instance" jsonPayload.earlyBootReportEvent.policyEvaluationPassed=false OR jsonPayload.lateBootReportEvent.policyEvaluationPassed=false OR jsonPayload.integrityReport.policyPassed=false - ログベースアラートを作成:
- 「アラートの作成」をクリック
- 条件: 上記クエリ
- 通知設定を構成
Terraformでの修復手順
GKE Shielded Nodesで整合性監視を有効にするTerraformコードと、主要な修正ポイントを説明します。
# -------------------- ① VPCネットワーク設定 --------------------
resource "google_compute_network" "gke_network" {
  name                    = "gke-secure-network-${var.environment}"
  auto_create_subnetworks = false
  project                 = var.project_id
}

resource "google_compute_subnetwork" "gke_subnet" {
  name          = "gke-secure-subnet-${var.environment}"
  network       = google_compute_network.gke_network.id
  ip_cidr_range = "10.0.0.0/20"
  region        = var.region
  project       = var.project_id

  secondary_ip_range {
    range_name    = "pods"
    ip_cidr_range = "10.4.0.0/14"
  }

  secondary_ip_range {
    range_name    = "services"
    ip_cidr_range = "10.8.0.0/20"
  }

  # フローログの有効化(セキュリティ監視用)
  log_config {
    aggregation_interval = "INTERVAL_5_SEC"
    flow_sampling        = 0.5
    metadata             = "INCLUDE_ALL_METADATA"
  }
}

# -------------------- ② GKEクラスタ設定 --------------------
resource "google_container_cluster" "secure_cluster" {
  name     = "gke-secure-cluster-${var.environment}"
  location = var.region
  project  = var.project_id

  # 初期設定
  initial_node_count       = 1
  remove_default_node_pool = true

  # ネットワーク設定
  network    = google_compute_network.gke_network.name
  subnetwork = google_compute_subnetwork.gke_subnet.name

  # IPアドレス割り当て
  ip_allocation_policy {
    cluster_secondary_range_name  = "pods"
    services_secondary_range_name = "services"
  }

  # プライベートクラスタ設定
  private_cluster_config {
    enable_private_nodes    = true
    enable_private_endpoint = false
    master_ipv4_cidr_block  = "172.16.0.0/28"
  }

  # Binary Authorization(追加のセキュリティ)
  binary_authorization {
    evaluation_mode = var.environment == "production" ? "REQUIRE_ATTESTATION" : "PROJECT_SINGLETON_POLICY_ENFORCE"
  }

  # セキュリティ設定
  master_auth {
    client_certificate_config {
      issue_client_certificate = false
    }
  }

  # ロギング設定
  logging_config {
    enable_components = [
      "SYSTEM_COMPONENTS",
      "WORKLOADS",
      "APISERVER"
    ]
  }

  # モニタリング設定
  monitoring_config {
    enable_components = [
      "SYSTEM_COMPONENTS",
      "APISERVER",
      "CONTROLLER_MANAGER",
      "SCHEDULER"
    ]

    managed_prometheus {
      enabled = true
    }
  }

  # Workload Identity
  workload_identity_config {
    workload_pool = "${var.project_id}.svc.id.goog"
  }

  # リリースチャネル
  release_channel {
    channel = var.release_channel
  }

  # ネットワークポリシー
  network_policy {
    enabled  = true
    provider = "CALICO"
  }

  # Pod Security Standards(1.25以降推奨)
  # pod_security_policy_config {
  #   enabled = true  # 1.25以降は非推奨
  # }

  # Security Posture Dashboard
  security_posture_config {
    mode = "BASIC"
    vulnerability_mode = "VULNERABILITY_BASIC"
  }
}

# -------------------- ③ Shielded Nodes対応ノードプール --------------------
resource "google_container_node_pool" "secure_nodes" {
  name       = "secure-shielded-pool-${var.environment}"
  location   = var.region
  cluster    = google_container_cluster.secure_cluster.name
  project    = var.project_id

  # ノード数設定
  initial_node_count = var.initial_node_count

  # オートスケーリング
  autoscaling {
    min_node_count = var.min_node_count
    max_node_count = var.max_node_count
  }

  # ノード管理
  management {
    auto_repair  = true
    auto_upgrade = true
  }

  # アップグレード設定
  upgrade_settings {
    max_surge       = 1
    max_unavailable = 0
    strategy        = "SURGE"
  }

  # ノード設定
  node_config {
    preemptible  = false
    machine_type = var.machine_type
    disk_size_gb = 100
    disk_type    = "pd-ssd"

    # Shielded Instance設定(重要)
    shielded_instance_config {
      enable_secure_boot          = true  # セキュアブートを有効化
      enable_integrity_monitoring = true  # 整合性監視を有効化(必須)
    }

    # イメージタイプ(Shielded GKE nodes対応)
    image_type = "COS_CONTAINERD"  # Container-Optimized OS
    # 他のオプション: "UBUNTU_CONTAINERD", "WINDOWS_LTSC_CONTAINERD"

    # ブートディスクのKMS暗号化(追加のセキュリティ)
    boot_disk_kms_key = var.boot_disk_kms_key

    # メタデータ設定
    metadata = {
      disable-legacy-endpoints = "true"
      block-project-ssh-keys   = "true"
      enable-oslogin          = "true"  # OS Login推奨
    }

    # Workload Metadata
    workload_metadata_config {
      mode = "GKE_METADATA"  # より安全なメタデータサービス
    }

    # サービスアカウント
    service_account = google_service_account.gke_node_sa.email
    oauth_scopes = [
      "<https://www.googleapis.com/auth/cloud-platform>"
    ]

    # ラベル
    labels = {
      environment     = var.environment
      security_level  = "high"
      shielded_nodes  = "enabled"
      integrity_check = "enabled"
    }

    # タグ(ファイアウォールルール用)
    tags = ["gke-secure-node", var.environment]

    # ゲストアクセラレータ(必要に応じて)
    dynamic "guest_accelerator" {
      for_each = var.enable_gpu ? [1] : []
      content {
        type  = var.gpu_type
        count = var.gpu_count
      }
    }

    # 予約設定(本番環境用)
    dynamic "reservation_affinity" {
      for_each = var.use_reservation ? [1] : []
      content {
        consume_reservation_type = "SPECIFIC_RESERVATION"
        key                      = "compute.googleapis.com/reservation-name"
        values                   = [var.reservation_name]
      }
    }
  }

  # ノードの場所(マルチゾーン対応)
  node_locations = var.node_locations
}

# -------------------- ④ サービスアカウント設定 --------------------
resource "google_service_account" "gke_node_sa" {
  account_id   = "gke-secure-node-sa-${var.environment}"
  display_name = "Secure GKE Node Service Account"
  project      = var.project_id
}

# 最小権限の原則に基づく権限設定
resource "google_project_iam_member" "gke_node_roles" {
  for_each = toset([
    "roles/logging.logWriter",
    "roles/monitoring.metricWriter",
    "roles/monitoring.viewer",
    "roles/container.nodeServiceAccount"
  ])

  project = var.project_id
  role    = each.value
  member  = "serviceAccount:${google_service_account.gke_node_sa.email}"
}

# -------------------- ⑤ 整合性監視のアラート設定 --------------------
# ログベースメトリクスの作成
resource "google_logging_metric" "integrity_violations" {
  name    = "gke-integrity-violations-${var.environment}"
  project = var.project_id

  filter = <<EOF
    resource.type="gce_instance"
    resource.labels.cluster_name="${google_container_cluster.secure_cluster.name}"
    (
      jsonPayload.earlyBootReportEvent.policyEvaluationPassed=false OR
      jsonPayload.lateBootReportEvent.policyEvaluationPassed=false OR
      jsonPayload.integrityReport.policyPassed=false
    )
  EOF

  metric_descriptor {
    metric_kind = "DELTA"
    value_type  = "INT64"
    unit        = "1"

    labels {
      key         = "node_name"
      value_type  = "STRING"
      description = "Name of the node with integrity violation"
    }

    labels {
      key         = "violation_type"
      value_type  = "STRING"
      description = "Type of integrity violation detected"
    }
  }

  label_extractors = {
    "node_name"      = "EXTRACT(resource.labels.instance_id)"
    "violation_type" = "EXTRACT(jsonPayload.earlyBootReportEvent.policyMeasurements[0].policyName)"
  }
}

# アラートポリシー
resource "google_monitoring_alert_policy" "integrity_alert" {
  display_name = "GKE Node Integrity Violation - ${var.environment}"
  project      = var.project_id
  combiner     = "OR"

  conditions {
    display_name = "Integrity monitoring failure detected"

    condition_threshold {
      filter = <<EOF
        metric.type="logging.googleapis.com/user/gke-integrity-violations-${var.environment}"
        resource.type="gce_instance"
      EOF

      duration   = "0s"  # 即座にアラート
      comparison = "COMPARISON_GT"

      threshold_value = 0

      aggregations {
        alignment_period   = "60s"
        per_series_aligner = "ALIGN_COUNT"
      }
    }
  }

  notification_channels = var.notification_channels

  documentation {
    content = <<EOF
## GKE Node Integrity Violation Detected

A node in the GKE cluster has failed integrity monitoring checks, indicating potential tampering or compromise.

### Immediate Actions:
1. Isolate the affected node using kubectl cordon
2. Investigate the violation details in Cloud Logging
3. Drain workloads from the affected node
4. Replace the node if compromise is confirmed

### Investigation Commands:
```bash
# Cordon the node
kubectl cordon <node-name>

# Check node status
kubectl describe node <node-name>

# View detailed logs
gcloud logging read '
  resource.type="gce_instance"
  resource.labels.cluster_name="CLUSTER_NAME"
  (jsonPayload.earlyBootReportEvent.policyEvaluationPassed=false OR
   jsonPayload.lateBootReportEvent.policyEvaluationPassed=false)' \
  --limit=50 \
  --format="table(timestamp,resource.labels.instance_id,jsonPayload.earlyBootReportEvent.actualMeasurements[0]:label=VIOLATION)"
最後に
この記事では、GKE Shielded Nodesで整合性監視によるノードセキュリティ強化設定手順について、リスクと対策を解説しました。
整合性監視を有効化することで、ルートキットやブートキットなどの高度なマルウェアを検出し、システムの信頼性を大幅に向上させることができます。
この問題の検出は弊社が提供するSecurifyのCSPM機能で簡単に検出及び管理する事が可能です。 運用が非常に楽に出来る製品になっていますので、ぜひ興味がある方はお問い合わせお待ちしております。 最後までお読みいただきありがとうございました。この記事が皆さんの役に立てば幸いです。
CSPMについてはこちらで解説しております。併せてご覧ください。
